Showing posts with label physics. Show all posts

Tuesday, 29 December 2020

Final assessment ideas: Physics/Science BINGO!

A 6x6 bingo board with 23 grade 12 physics topics listed; there are 7 green boxes indicating choice of unit and 6 blue "Choose a science topic not listed" boxes.

(I've put my resources and a link to Mike Mohammed's bingo assessments at the bottom of this post if you want to skip over the discussion.)

When we went to emergency remote learning last spring, our science department elected not to do a formal "exam". Since we were required to provide some kind of summative assessment opportunity, I was really happy I had come across this BINGO video idea from Kevin McChesney of @TigerPhysics earlier in the year.

I had been planning to adapt it for last year's summative project anyway, but it was perfect for lockdown science once I tweaked it a bit to make it work for our situation: all assessments were optional, and because we are a full-year school (as opposed to semestered), we were only allowed to give a total of 1.5 hours of work a week per course.

They had to choose a row or column, or one of the two diagonals (for the physics only) and create a video/slide-show/portfolio/study guide/something showing how well they understood the topics in that row, column, or diagonal. The more connections they made to things they had learned, the better! (For example, if the topic was Normal Force, I wanted them to talk about how it related to other "topics" such as the force of gravity, the force of friction, Newton's laws of motion, kinetics, etc.) They could hand in different topics at different times, and each topic could use a different medium.

The Rules
  • no more than 2 items in each row/column may use material that is not their own work
  • if they are using someone else’s video, they may not also use the audio
  • each video must have material from each of the 4/5 units
  • for the pale green box(es), they include a topic of their own choosing from the missing unit; subject to my approval. They were given lists of suggested topics.
  • the blue squares are a free topic: they may choose any other topic as long as it is something that was covered in class; subject to my approval
Additional requirements for physics:
  • at least three topics must include discussion of how they would find a mathematical prediction; all topics must discuss conceptual understanding
  • there must be at least one practical demo
and for grade 9 science:
  • Experimental design: they pick a topic from a list, which includes possible independent and dependent variables. They design an experiment to test the effects of changing one variable on another. They don’t need to perform the lab, but they will write it up as if they had, and set up a data table and graph for the results.
I wanted to keep it as PITA-free as I could for them, especially since some students had been having difficulties uploading the weekly videos to Flipgrid. I asked them to submit a rough draft or outline at least a week before the final due date so I could give feedback using Screencastify, and I made that part of the final mark so they would actually hand in a draft. (By the way, I'm going to blog about how much I loved making video comments on student drafts; you should absolutely try it.)

I started from TigerPhysics's grid and just made changes to reflect our curriculum. I took out the projects because the time restriction meant building/making anything was probably unrealistic, even if they could do it without leaving their homes. The green option boxes came about as I figured out which unit was missing from that row/column/diagonal. Of course, I've since realized that this is just a Sudoku board and could have saved myself some grief, but I kind of liked that it gave additional choice within a constraint. 

A 6x6 bingo board with 23 grade 11 physics topics listed; there are 7 green boxes indicating choice of unit and 6 blue "Choose a science topic not listed" boxes.


Grade 9 science only has 4 units, but we wanted them to do a lab design since it was something we had been focussing on all year. Although they didn't have to do the lab, we picked experiments they could do at home if they had the equipment: paper helicopters, soap suds, bouncing balls, etc., with suggested independent and dependent variables. (These are experiments we ask them to design during the in-school lab exam, so fortunately that wasn't any extra work.)

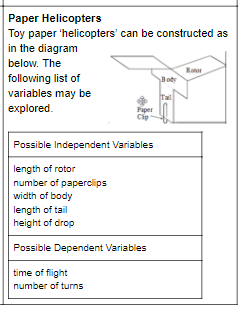
A 6x6 bingo board with 23 grade 9 science topics listed; there are 6 green "lab design" and 6 blue "Choose a science topic not listed" boxes. One box says "Choose a science topic from Ecosystems or Space"Paper Helicopters. List of possible independent and dependent variables.


There's some doubled and missing units in a few lines, again because I just started from Kevin's grid. For future use I've rejigged the unit distribution for 4/5/6 units and 4 units + lab design/build (which is just 5 units with some colour formatting) (so "unit" can be any grouping of content you wish, or a build/lab design/drawing/whatever you need). Each includes a free-choice box. If you want to make your own or need a different-sized board, dCode.xyz is the Sudoku-maker I used. Type 'Sudoku' into the search bar and choose your size. Click "Fill" and type single letters or digits in to represent the topic group (no spaces to get them lined up across the top of the board). Remember to tick the "Mode Sudoku X" box if you want the diagonals, choose one of the nifty shapes if you want to give the students even more choice, and click "Solve Sudoku". (Également, il est disponible en francais.)


I loved this project. I got some amazing things out of the students -- granted, they were the students who were still participating in the great online experiment of Spring 2020, but I'm definitely going to be doing it in the future. I particularly want to incorporate Mike Mohammed of @Mo_Physics's idea of using Bingo choice boards for student end-of-unit review; that way they have a base of video footage they can either revise or reuse at the end of the year. I also liked that in a course with different sections, where different teachers may have focussed on different topics to different degrees (no matter what we plan), each teacher could swap out a topic or two and still maintain the integrity of the assessment across classes.

Here's an example from a grade 11 student about Normal Forces (with a wee bit of possible miscommunication about N3, the normal force, and the force of gravity), posted with permission. The student chose to do their math in other topics, alas. For reference, in Ontario grade 11 physics deals primarily with 1D forces; we leave the math of inclined planes to grade 12. (The slides precede the video, which has no sound.)


(Newton is making a repeat appearance from the student's Newton's law video. And you bet I make them cite where they get their meme graphics from!)

Future thoughts: adding a build requirement to the project (or choice of build/lab design for physics), decreasing the amount of "other people's work" the senior grades are allowed to include, including 1-1 conferencing check-ins, working out how to do something similar for math courses, optional working with a partner on certain segments...

Resources: McPhee's Summative Bingo planner and emergency remote learning Assessments

Summative Choice Board planner

Grade 11 physics (SPH3U) remote learning summative assessment


Monday, 13 July 2020

PD with a cat in your lap

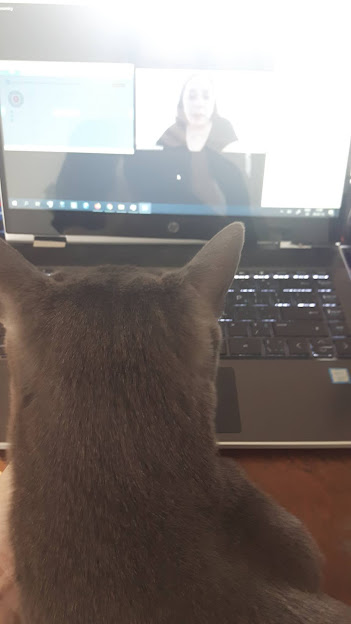
If there is one positive thing that has come from this pandemic and the sudden switch to everything virtual, it's that there is a literal world of online PD available out there, and you can roll out of bed and attend it in your pjs. With a cat on your lap or not, as it happens.

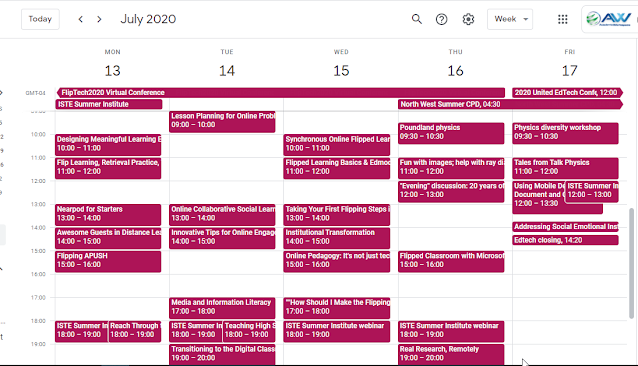
Currently it seems like all the PD is happening at the same time. This week, in fact.
A screenshot of my Google Calendar. Almost all the spots are filled with some kind of online PD.
That's four conferences in one week. I'm going to be busy!

This current spate of PD (or CPD as some call it) actually started this past Saturday with the Seneca Virtual Science Conference. Seneca is a free UK homework and revision platform, and they have been offering free, short but packed conferences in all subjects, as well as pd for online teaching and free courses for teachers in things like metacognition, literacy, etc. You can check out the recorded science webinar and presentation resources at the link above. 

And yes, I had to get up at 3:45 am to attend. But it was over by breakfast time!

They are also hosting some post-conference Twitter chats this week at 7:30 pm BST. #senecaCPD


Three of the virtual conferences focus on tech or general pedagogy; scroll down if you're just interested in physics.

FlipTech2020 logo

The free FlipTech 2020 conference actually started yesterday and continues until Thursday. What I'm liking about this conference is that they are actually flipping it. You can hop in at any point; watch the videos/presentations before hand, then join the speakers for a live Q&A Zoom. The Zoom meetings are being recorded, so you can catch up if you miss something. Follow #FlipTech2020 for details and updates.

ISTE Summer Learning Academy July 13-31, 2020


ISTE is hosting a 3-week Summer Learning Academy starting today until the end of July, although you will be able to access the materials until October. It's only $US 20 (more if you want the yearly membership which gives you access to more courses). This academy is specifically focussed on online learning, which seems somewhat appropriate these days. There are daily webinars and 4 microcourses which you can work on at any time -- convenient if you happen to have filled up your schedule with other online PD! The schedule is here.

United EdTech Conference logo

I'm really pleased to be attending the 2020 United EdTech Conference this Friday and Saturday, which will be elevating BIPOC voices and examining best pedagogical practices for using edtech. The days will be short and sweet, with a 90-minute Pedagogy in Practice session followed by a 30-minute Lunch and Learn session. The webinars will be recorded and made available, which is great since there are too many good options and we can only pick one each day. Fortunately, some of the lunch and learn sessions will be repeated on day 2. The $US 10 fee will be donated to The Learning Laboratory New Orleans.

Yes, the FOMO is real.


IOP and TalkPhysics logo

I've been following the UK Institute of Physics for a while, envious of all the teacher PD they provide. They've had to move a lot of their PD online and it's been fantastic. Attending the South Region 3-day event at the beginning of July meant more 3:30 wake-up calls, but it was worth it. (And let's face it: rolling out of bed, making a cup of tea, and getting to the presentation in 15 minutes is a practice I don't really mind repeating.) I've been attending scattered workshops as well, and am on the lookout for the next Power of Per workshop since I couldn't attend last Thursday. The North West region is having their 3 days starting this Thursday until Saturday.

As for how to attend more than one workshop at once? Even with an extra Chromebook, that might be a bit much, but I'll figure it out.
A sma;; grey cat is seen from behind, staring at a laptop screen on which there is a Zoom meeting.


Thursday, 25 April 2019


I will be presenting two micro sessions at Unleashing Learning today: Getting Started with Math Techbook from 1:25- 1:45 and Formative Assessment with Plickers from 2:05 - 2:25, both at Table 1. 

Come join me!


Friday, 14 September 2018

Upcoming: STAO 2018

I'm excited to be presenting at STAO this year. I'll be giving an updated version of my OAPT talk: Beyond the Traditional Lab: Tips and Tweaks for Critical Thinking. It will have a definite physics slant, but the ideas can be applied to all sciences.

The talk will be on Thursday, November 8 at 3:30 pm. You can register for the conference at www.stao.org.


Saturday, 12 May 2018

OAPT Conference overview and sundry nifty physics things I've been working on


I'm writing this on the train back from the OAPT conference hosted at the University of Western Ontario, and it was, of course, amazing. I have so many thoughts and new great ideas to put into practice. Some quick takeaways: 
  • thinking about using improv techniques in class to overcome my (and students') implicit bias, especially "Yes, and?"
  • "We use mathematics to help us make the physics more precise."
  • "Just because I don't have a 'math brain' doesn't mean I don't have something useful to contribute."
  • "You're not part of a group, you're part of a team."
  • Yes, the students do really need to draw a picture
  • Why haven't we been using the rotunda at Jarvis to make super-long pendula?
Also, this happened:
I think I'm going to have to wait until June to do the write-up justice.  I will share my presentation on Tweaking the Traditional Lab below; a link to various files and resources is posted in the resources section of this blog.


(Incidentally, one of the things I always like to mention when I'm introducing myself at presentations is how amazing the PD is on Twitter. The chart on the first slide is a perfect example. Elizabeth Houwen (a math teacher, incidentally) posted it last June, and I thought it would be a great way to get the students to practice unit conversions as well as estimation, and we also got a nice little lab out of it and an anchor chart so they have "reasonable" speeds to compare their answers to. All from one small tweet!)

***

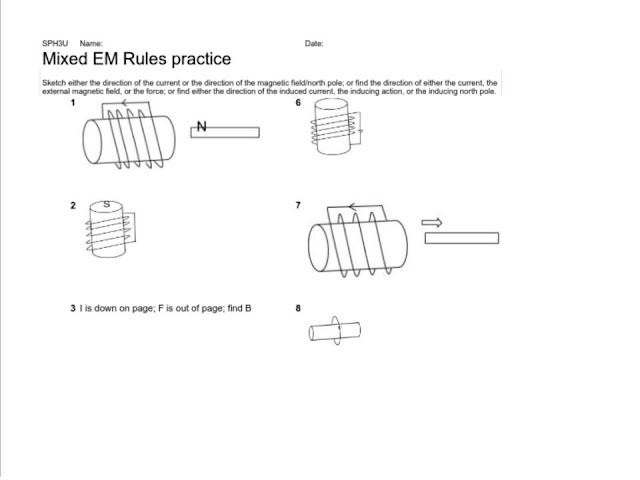
I've been busy converting my drill sheets practice sheets, which I mentioned in my last post) into Google sheets, as well as creating new ones. I'm fairly proud of the chemical nomenclature one (in part because I just found out how to write superscript and subscript numbers in Sheets, so the clunky ^3 _4 notation is mostly gone), but I really want to share the electromagnetic right-hand rules ones.

I made these using the =image() function, which allows you to put an image directly into a cell (and not just overlay the image on top). Unfortunately, you can't use the shared url of images on your Google drive (which is odd and annoying).

I'll probably refine the mixed version so that it's a little more clear what you need to find in each question; I'm not sure a student would recognize immediately that they need to find the direction of the action of the magnet for 1 and the location of the north pole for 6.

1st half of right hand rules practice sheet

2nd half of right hand rules practice sheet

You can find these and a lot more randomized practice sheets at my course website; click on the practice sheets link under Resources.

Incidentally, sometime between last December and April, Google changed the formatting of "publish to pdf" for Sheets so that it's landscape instead of portrait. There doesn't seem to be a way to modify this, and it's really mucked up my formatting. Everything is spread over two pages, and don't get me started about what it did to my spectroscopy sheets.

Please let me know if you find these useful!

Tuesday, 19 December 2017

Need spectrography and HR diagram drill sheets? Here you go!

In ongoing PD news, you can still register for the Ditch That Textbook Digital Summit; 9 videos, 9 days. The videos will be available until Dec. 31. Follow the fun at #ditchsummit on Twitter.

I'm still trying to put together my blogs for the fall PD I've been doing, but for now I wanted to share a few things I'm really excited that I figured out how to do.

Inspired by Robert Prior many years ago, I started coding a lot of Excel spreadsheets as randomized drill sheets on many topics. My goal for this year is to get most of them up as Google Sheets so I can publish them to the web and students can go straight to my website to print out an infinite number of sheets.

Anyway, I've also been working on adding new, richer sheets to my catalogue. In particular, I was very jazzed last year when I figured out how to get a spreadsheet to draw spectrographs (hint: error bars). And last night I spent far too long working on how to get a Hertzsprung-Russel diagram (yay for the Bubble chart, boo for the fact that the labels are arbitrarily hidden when you go to a larger font).

Behold, I give you my Spectrograph and HR diagram drills for the grade 9 space unit (and Earth and Space science, too).
jpg of spectroscopy drill sheet; click link for other sheets.jpg of HR diagram drill sheet; click link to see the pdf versions

I'm still working on the HR diagram answers; I have to figure out how best to get it to choose whether it's on the main sequence or not. Also, I think I need more white dwarf stars, because that area is looking pretty sparse.

However:
gif of Liz Lemon high-fiving herself

 If you'd like to see my other drill sheets, head on over to the drill sheet section of my course webpage. It's very much a work in progress. I have a lot more sheets than I've listed there.

Saturday, 10 June 2017

Group multiple choice tests and DIY scratch cards

Last year while on leave I had the opportunity to watch a live webinar with Eric Mazur on assessment as a silent killer of learning, and I got really excited by one of the ideas he presented. Here's a video of that same lecture; the pertinent section starts at around 41 m 44 s and it's only about 6 minutes long. I recommend watching the whole video some time.


I love this idea. It's like test corrections, but without my having to grade the test first. Because of the nature of the test, the question level should be such that it should be difficult for any one student to get 80% by themselves. Lots of higher-order thinking skills, not so much of the recall.

I was hoping to try this method out with my pre-AP physics class several times this year, but I only got a chance to do it once right at the end in the electromagnetism unit. I opted to go the scratch card route, since coding a trouble-free non-mc group test would take more time and energy than I usually have in May and I also already have a nice bunch of conceptual mc questions (plus some shamelessly pulled from previous OAPT physics contests for extra oomph).

My test was 15 questions long. The students sat around trapezoidal tables in groups of 3-4 more or less based on their (self-chosen) lab groups -- the class is pretty homogeneous so that worked out fairly well grade-wise. I gave them 25 minutes to solve the questions on their own, then put the scratch cards on the tables. I also gave them individual white boards and let them use the blackboards if they wished. [One of my students is mute, and since I didn't let them use their phones, having a personal whiteboard for communicating was crucial.] They had the rest of the period (45 minutes) to redo the test as a group. Difficulty-wise, I tried to err on the side of the test being too easy since it was our first try (and I always tend to think questions are too easy when in reality, not so much).

action shot of group mc test


I have to say, it was a lot of fun to watch. There was cheering. There were groans of agony. Most importantly, there was immediate feedback and learning... and I didn't have to mark it myself. Marks-wise, we went from high 50s to mid-90s, with most marks in the 70s. The marks are a bit lower than this class is used to, but I'm putting that down to it being the last test of the year and having rushed through teaching some of the material. I wound up just adding their individual marks to the group marks and making the whole thing out of 70 (one of the questions was a bit too confusing, so I made it a bonus).

Weirdly, not many of them used the whiteboards. I need to get the students using the whiteboards early and often in class so they are used to thinking things through visually.

I wish I had done this for the post-friction lab quiz. I am thinking that I will adopt this for the multiple-choice sections of future tests; since I'm considering moving to standards-based grading for the calculations/written explanations, I might get the best of both worlds.

On to the slightly more crafty section of the post.

required materials for scratch card

I used 4x6" matte photo cards because I have a huge number of them at home, but you could probably use construction or even regular paper. There is also the online IF-AT test maker, but that is geared towards (very) large groups (minimum 125 cards). To send the cards through the "no, I really only want to print on letter-sized paper and maybe legal if you really insist" school laser printer, I used loops of masking tape to tape the wrong side of the photo card to a scrap piece of letter-sized paper and send it through. Using masking tape is important because it doesn't form an immediate permanent bond like clear tape does; you're less likely to tear the card when you remove it. Painter's tape would be even better for this. I had to experiment to see which side tore less.
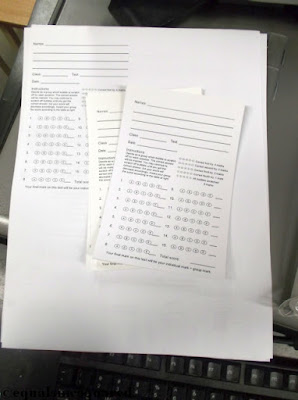
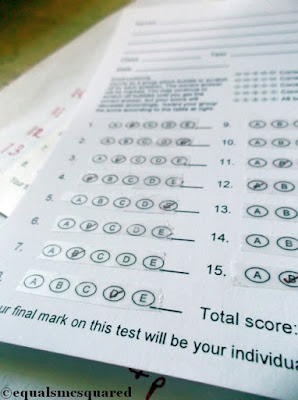
printing the cardsbubble cards printed


Once you've printed your cards and answered them (I used a red checkmark), you make them into scratch cards. How to DIY: some quick Googling brought me to this site. Essentially, you need some clear tape, acrylic paint, dish soap, and a brush.

one coat of gold paint
tape over the bubbles


You tape over the bubbles, then mix 2 parts paint to 1 part dish soap, and apply. Ideally, you'd apply thin coats so you don't get a lumpy paint job, but frankly the bubbles are so small I don't think it matters. I started by using gold paint but it was taking too long to become opaque -- I got up to 5 coats on my tester cards and you could still see through the paint (on both sides if you held it up to the light), although it's possible I originally had too high a ratio of soap to paint. I added a large dollop of grey paint and presto! I only needed 2 coats to cover my bubbles.

You could make a stencil if you wanted to get really finicky and avoid overpainting; I just scraped off the worst of the excess paint where I could.

painting in the bubbles on the scratch cards


I also made scratching tools by cutting up an old plastic membership card. The flat edge was pretty much the size of a bubble, so they wouldn't "accidentally" scratch off part of the wrong bubble. The kids loved scratching off the answers; this would be fun to do as a vocabulary lottery card-type thing or a fun take on a homework pass. And it's reusable!

scratch cards completed

I'm also going to explore doing this as a computer exercise because multiple choice is great for conceptual questions, but a bit of a pain for calculation exercises. I like that in Mazur's version, the group members' answers come up and that's what they discuss. I'm sure Mazur got someone to code specialty software, but I think it could be done with GAFE tools using a combination of Forms, Sheets, my self-grading quiz tutorial, and the FormRanger add-on. The one difficulty I see is getting the students to write exactly what I put in as an answer, and how to let them know that they need to fix a small issue (say, sig figs or direction) as opposed to having completely the wrong answer.

What other ways could we use scratch cards (physical or computer-based) in class?

Thursday, 2 February 2017

Google Camp is coming...

Google Camp poster: I'm sharing Google Sheets: More than Just Number Crunching and Flipping Your Lessons: Tools and Tips

TDSB Google Camp 4.0 will be Saturday, March 4. At the risk of seeming like a Google Groupie, I love Google Camp; I've learned and been inspired by so much at every session I've attended -- not least during the demo slam at the end. I'm excited and more than a little trepidatious this year to be joining some amazing speakers. During the day, there will be a room with helpful helpers available if you've been running into difficulties with GAFE and need someone to walk you through the solution.

More info will be available soon at http://bit.ly/tdsbcamp, but TDSB teachers can register now through Key To Learn. This will sell out, so act now!

Sunday, 20 November 2016

STAO Saturday

stao2016 logo
Another day back in the wilds of Etobicoke for more STAO goodness.

Session 1: Flipping It with EDpuzzle with Adam Mills.

When I started flipping lessons two years ago, I made a conscious decision not to use a special flipping platform because I'm not keen on having kids sign in to access materials. I also want parents/guardians (or anyone else, frankly) to be able to freely access any of my materials and, in particular, without having to go through me to sign in. However, in Friday's session on blending learning tech, Mathieu Morin mentioned that EDpuzzle was integrated through GAFE. I was already planning on attending this morning's session, but now I was even more intrigued.

So.. it turns out that it's just integrated with Google Classroom, which I don't use, but there are other benefits to using it. The most important for me is that you can embed questions, which is great for making the lessons more interactive. I realized that I make my students "log in" to their webquizzes anyway, so this shouldn't exactly a huge difficulty, and the videos are still hosted on YouTube. I'm going to experiment with using this platform a bit more. I'm liking the possibilities for POE.

Now if only EDpuzzle would get back to me about why neither I nor my students can see the closed captioning option, that would be terrific.

This session took place in the Playground, so afterward I got a chance to look around a bit. The secondary curriculum committee had some great electricity demo boards, including this one with a balloon fuse on the short circuit.
balloon fuse
(He asked me if I noticed the light changing, but I was too busy cringing at the balloon popping.)

I also saw something I really want for the next gift-giving opportunity:
Totally adorable, programmable, and only about $50.

I think next year there should be better signage for the Playground, because on Friday I thought it was just another session room and walked on by.

Session 2: Flipping the Learning: Transformational! Part I: What It Is and Looks Like with Meg O'Mahoney.

Yes, I was all about the flipping today. While the previous session was more about playing around with EDpuzzle, this session focused on the nitty gritty of flipped learning -- which is apparently not the same as a flipped classroom. The platform Meg uses is sophia.org, which has a lot of PD about flipping and would be worth checking out just for that.

Some of my takeaways: while you can use already-available videos, it's better to make your own (or at least have your own voice) since you are their teacher; students love it when you put your face in the video; and make sure they are doing something to stay engaged during the video.

Now where is Part II?

Session 3: Innovative Classroom Science with Sarah Chisnell

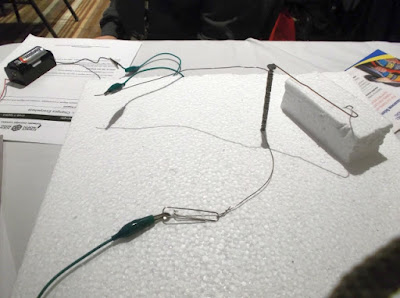
Science North has developed lesson plans from K to 12 with the idea that we should give students something to do so that learning naturally follows. The activity we looked at was building a telegraph for the grade 9 electricity unit. So what if they happen to learn something about electromagnetism early - that's just a bonus! I really like these lesson plans, especially if I put them together with yesterday's design strategies.

electromagnetic telegraph

For the record, our prototype sort of worked. I call that a win.

Session 4: Disrupting "Inquiry" for the Sake of Learning with Dimitrios Melegos

So many great specific ideas from this session, including giving a pre- and post-lab attitudinal surveys (with 10 tricky T/F questions about the content, graphical analysis) to track learning; having a post-lab reflection; sharing past exemplars and results; getting them to write a research proposal "on a napkin"; giving them opportunities to share their results with the class.

One thing I really want to give my students is the opportunity to incorporate "playtime" with the probes, so the students know how they work when they design their own labs. Dimitrios suggests using the cookbook procedure to get them to practice.

I also really like the idea of presenting their results to the class or writing up a summary report, because I rather dislike marking lab reports. Is there anyone who doesn't?

All in all, another successful STAO. I can't wait to start incorporating... everything.

Friday, 18 November 2016

STAO Friday

stao2016 logo
The Science Teacher's Association of Ontario's annual conference is one that I try to get to every year, because I know that I will always come away with new ideas. This year's conference took place last weekend (right before my marks were due) and as usual, I came back brimming with inspiration.

Session 1: Inquiry-Based Learning in Senior Chemistry with Minor Tweaks in Your Lesson with Blunky Ng

Thanks to construction on Lawrence, my bus was slightly late so I arrived to a standing-room only, spilling out the doors session. I don't teach chemistry beyond grade 10 (for good reason), so I probably won't use the specific labs she mentioned, but the main gist is: instead of starting with the theory and then doing a lab to confirm, start with the lab (without telling students what the lab is about). I already do this a lot in physics, but can I do more? The answer is, naturally, yes. I also think I could be doing this more in grade 9 and 10 science.

I didn't manage to get to STAO last year, so I don't know if the hour-long break is a new development, but it's much welcome. I had plenty of time to explore the exhibit hall, which they moved to the main floor instead of tucking it away, without worrying about missing a session. Sadly, I didn't notice the new Playground room and so missed out on helping to build the Rube Goldberg machine.

If I was truly clever, I would have gone across the street to get some lunch.

Session 2: Intuitive Physics and Why It Matters with Richard Epp and Rohan Jayasundera

Richard and Rohan teach first year physics at the University of Waterloo, and they talked about how they teach students to think intuitively about physics instead of just pattern-matching problems. We want students to learn to build their intuition so they can trust it; they can then take that into other areas.

My main take-away from this session is that I need to teach dimensional analysis right at the beginning of the course instead of waiting for the dynamics unit. It ties in nicely with the idea of Reversing the Question, which I want to try with the big-5 kinematics equations. Also, there is a fantastic intuitive approach for developing the equation for circular motion I'm really looking forward to using.

Session 3: Crazy Demos with John Caranci and Steven Fotheringham
john caranci loop and chain

John was my Physics Honours Spec. instructor and if you've never seen him in action, I highly recommend it. I'd seen pretty much all of these demos before, but this was a great opportunity to film them while he was explaining them. I also now have to go find an aluminum tube for an extension to the falling cow magnet demo.

And practice with my chain and ring. A lot.

Session 4: Putting It All Together: Blending Learning Approaches to Foster 21st Century Learning with Mathieu Morin

The MOE has put out a draft of its 21st century competencies document, and the gist is that we want to shift from just covering the content to focusing on deeper learning. Mathieu led us through his journey into adding all the acronyms to his class, starting with the basic class website, through flipping the class to make time for IBL, PBL, etc.

Small takeaways: watch one video in class and teach them the Cornell note-taking method; Office Mix is a plug-in to create videos from your PowerPoints; look to academia for ideas for thematic projects for PBL and "dumb it down" for high school.

He was the first, but not the last, person this conference to say something along the lines of "Don't try to flip all your lessons at once. I did and it was foolish."

Session 5: Using Design Thinking in Your Science Classroom with Bluky Ng

The difficulty I always have at this conference is there are too many choices; I usually want to go to more than one session at any given time.* In this case, I got lucky since there was a typo and the Innovative Classroom Science session I had planned to attend was going to happen on Saturday instead, so I bookended my day with another great session with Bluky Ng. I like the Crazy-8s setup for brainstorming; turning it into a gallery walk with students posting additional ideas is great. Obviously I want to do this with the sci/eng club, but I also want to incorporate it into the physics and other science courses. I really like the idea for the grade 10 climate change: design something that will help a specific country reduce its effect on climate change.

As for the sessions I missed because I can't be in two places at once? Fortunately, STAO makes the presentation resources available to members on their website.

More on Saturday's sessions tomorrow.

*Invariably, all the physics sessions are at the same time. Why?

Friday, 4 November 2016

Marshmallow Challenge

I wanted to create a science/engineering club at school where we could focus on not just doing or learning about some cool science, although we will be doing that, but also giving the students a taste for engineering design. I always planned for the first session to be a variant on the Marshmallow Challenge, and yesterday we finally did it.
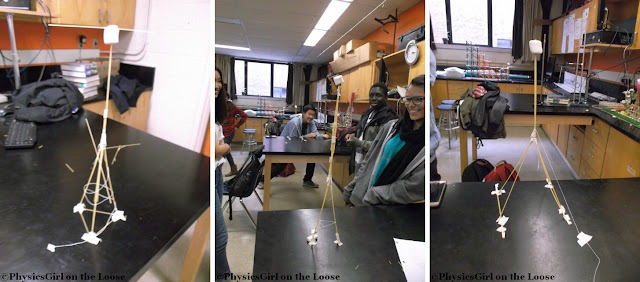
marshmallow challenge 2nd try

 You've probably at least heard of the Marshmallow Challenge -- but if you haven't, go here to watch the TED talk and learn more about it -- if not actually done it. I've done it several times... most recently on Wednesday, in fact, which was kind of hilarious given that I'd planned to do it with my sci/eng kids the very next day.

In brief, you get 20 sticks of spaghetti, 1 m of string, 1 m of tape, 1 marshmallow, and 18 minutes to build the tallest free-standing structure that will support the marshmallow. Usually when this challenge is done, the teams build the structure (or try to) which are then measured, the activity is debriefed, and then... nothing. Nobody gets a chance to learn from their mistakes or use the idea of prototyping.

Not on my watch.

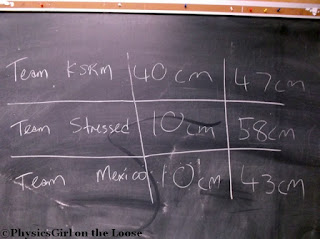
We did the challenge; one group got to 40 cm, but the other two... didn't quite get the tall structures they envisioned*.

not quite freestanding structure


Then I showed them the TED video. We talked a bit about why the less successful structures fell (they both built triangular prisms; the vertical rectangular sections all turned into parallelograms. Horizontal ones.) and the importance of prototyping. Afterword, we did the challenge again. I wanted to see if they would learn from their previous mistakes and build prototypes. There was a bit of that going on, but all three groups built towers above 40 cm, so I feel that the exercise was successful.

And everybody got candy.
Winner board

I'm busy sourcing ideas for other design challenges. I'm thinking of Cartesian divers**, CD hovercraft races (and other great ideas shamelessly borrowed from Roberta Tevlin), building a mirror maze and/or a windmill, and, my one true love, Rube Goldberg machines, but I'll happily take suggestions for other projects that can be done in an hour or so and are good for anyone in grade 9 up to grade 12.

What design projects do you do with your science club?

*We could have had four groups of three instead of the three groups of four, but hey, it's a club, so I let it go; I'll be a bit stricter with them next time.

**I spent the year two years ago diligently emptying Dr. Pepper bottles for just this purpose. I am nothing if not dedicated.

Thursday, 3 November 2016

Happy accidents

I've been teaching for a good while now, but I'm happy to know that there are still things I can learn, because it keeps me sharp. Also? Happy accidents become teachable moments and an exercise for one class turns into several exercises for three different classes.


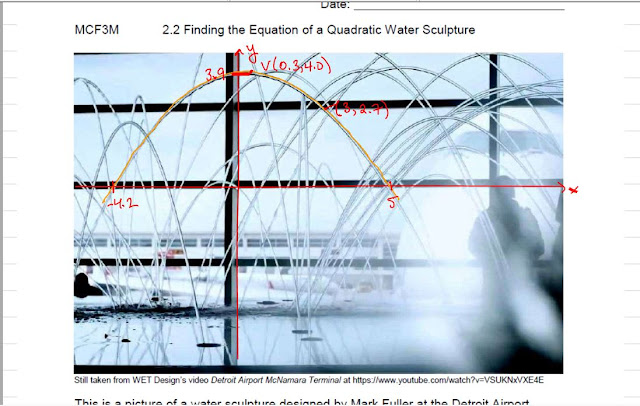
I'm always on the lookout for "real-world" examples of math and physics that aren't the usual boring cell phone/well bore/cannon ball stuff. I came across this video of the water fountain at Detroit International Airport and was struck by one image that was filled with different parabolas, thanks to the initial velocity of the water and the perspective of the shot. I turned it into an exercise and assignment for my MCR3U where they had to find the equations of two parabolas, and then the equation of three lines, one which was a secant to one parabola, one which was a tangent to the other, and the third was a secant to one and a tangent to the other.

Naturally, I wanted to modify it for use with my MCF3M class. I came up with an exercise where they find the equations of two parabolas: one in root form and one in vertex form. For their assignment, they'll have to turn each equation into the other form algebraically (plus standard form for good measure).

I tried it out three days ago. To help them prep, I got them to pick the axes and a parabola to look at (noting that each water jet is actually two parabolas). We measured the roots and used the y-intercept to find the a value. Pretty straightforward, and I thought determining the vertex form would be a snap.

Except that when we calculated a, we got a completely different number. Not "we're off by a few decimal places" different, but -0.19 vs -1.1 different. These students are still struggling a bit with vertical stretches and compressions, so a discrepancy like that is not on. 

I asked a colleague to verify my calculations, and he figured out that my calculations were fine. The problem was probably that for the parabola the class chose, the y-intercept and vertex were so close together that a=-1.1 was within the accepted error. I used another point far from the vertex and got a=-0.18. Much better.

screenshot of quadratic water sculpture notes

[By the way, we I did also make some heinous measurement and calculation mistakes, but since all mistakes I make are intentional (ahem), this just gives me an opportunity to talk about making sure our values make sense. More happy accidents.]

Unfortunately, I had the DLL PD today, so I wrote this all down on the board and hope they got it during today's class. I'll review on Friday when I next see them. They need to have the equations (and domains and ranges) ready for next Thursday's assignment.

That discrepancy is really interesting. I will have to modify this worksheet to tell the students to make sure their points are not too close together. Plus, I may have accidentally stumbled on a realistic way to teach uncertainty in my grade 11 physics class. A happy accident indeed. I'll keep you posted.


Once I get my act together, I'll create a page where I will share my various worksheets and handouts. For now, check out my course webpages (link up top) under "Handouts and Assignments". My class notes for both (all three?) lessons will be posted under the "Notes" section at the end of the month.