- Part 1: Automating homework tweets to calendar entries using IFTTT and scripts (the overview)
- Part 2: Sorting course tweets in Sheets using query()
- Part 3: Publishing a Sheet to the web
- Part 4: Importing data to a new Sheet
The gist of this step is that adding a new line to the top of a course's "hw to calendar" Sheet triggers a script that turns the info into a Calendar entry. (This is why the tweets are listed in order of date+time tweeted and not the due date.)
There is probably a way to do this from within the master "Tweets by @Ms_McPhee" Sheet, but when I was setting this up last summer, I couldn't find anything straightforward apart from this script I grabbed from a blog post (which I've lost the link to, so thank you anonymous blogger for your help). I know just enough about coding to add to someone else's code, so it may be clunky, but it works.
When I was testing this last summer, I had no difficulties. Naturally when school started and I was tweeting in earnest, a couple of strange little bugs appeared. Namely, each time the Sheet changed the script ran twice and I got two identical Calendar entries. Also, any time I tweeted anything, homework or not, or was retweeted, or was even mentioned in a tweet, it "changed" the Sheet (even if there was no actual change to the content), triggering the script. Twice. Which created more identical calendar entries. Sometimes I would have upward of 12 identical homework (or even worse, test!) entries on one day. Some of the students were a little startled, and I was spending far too much time in Calendar deleting superfluous entries.
To solve the second problem, I threw in a validation process. You'll need to add the following formula to cell M1:
=COUNTUNIQUE(C:C)
N1 also has a number in it, added by the script; you should leave it blank to begin with. The script now checks the number of essentially non-blank (or unique) rows and compares it to the number in N1. If N1 is less than the number of rows (meaning we've just added new homework information to the Sheet), it will run the calendar function and set the number in N1 to the number of rows. Otherwise, it's a fake "update" and the script can ignore it. It works well; now I can participate in Twitter chats without stressing out my students in the Calendar. The only thing I have watch is when I tweet out similar homework for different sections of a course to make them slightly different; usually all I need to do is change a punctuation mark.
I haven't worked out what's going on with the double posting, though. It now seems to be happening more or less randomly.
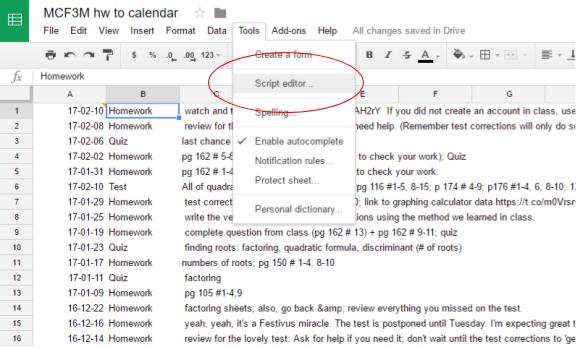
Here's how to get the script running. From the Tools menu, select "Script editor."
A new window will open. Delete the older code, and copy the code below in its place . it's a wee bit long, because my rule is to never delete anything but instead comment it out in case I want to use it later. I grabbed most of this from the internet; the main thing I added is the row counter business.
I'll explain what a few of the lines do. In general, a // in front turns the rest of the line into a comment and a semi-colon finishes an instruction.

Rows 24-55 are the main script function, getLatestAndSubmitToCalendar, which is pretty much what it says on the tin.
Before you can release it into the wild, you need to give your script permission to muck about with your Calendar. Save the script with a useful filename, then click Run -> getLatest...Calendar. During this run, a box will pop up asking to allow permission for the script to change your Calendar, etc. Let it. Then run it again to make sure it's working smoothly. I usually check it by manually changing N1 back to 0 (or one less than the number of unique rows), running the script again, checking that N1 has been changed, then checking the Calendar to see if the entry was created. You should get email notifications if the script fails to run.
The last step is to set the trigger. We want this script to run every time a new row is added (that is, when the Sheet is changed). Click on Resources -> Current project's triggers, or the stopwatch icon. If no triggers have been set, click on "No triggers set up. Click here to add one now.". Make sure "getLatest...Calendar" is selected under Run. Under Event, change "Time-driven" to "From spreadsheet," then choose "On change." Save the script, test it out by tweeting something, and you're now automatically turning your tweets into calendar entries.
So there you have the somewhat involved process of turning tweets into Calendar entries. Please let me know if you have any questions or suggestions -- especially about that nefarious double-trigger issue!
There is probably a way to do this from within the master "Tweets by @Ms_McPhee" Sheet, but when I was setting this up last summer, I couldn't find anything straightforward apart from this script I grabbed from a blog post (which I've lost the link to, so thank you anonymous blogger for your help). I know just enough about coding to add to someone else's code, so it may be clunky, but it works.
When I was testing this last summer, I had no difficulties. Naturally when school started and I was tweeting in earnest, a couple of strange little bugs appeared. Namely, each time the Sheet changed the script ran twice and I got two identical Calendar entries. Also, any time I tweeted anything, homework or not, or was retweeted, or was even mentioned in a tweet, it "changed" the Sheet (even if there was no actual change to the content), triggering the script. Twice. Which created more identical calendar entries. Sometimes I would have upward of 12 identical homework (or even worse, test!) entries on one day. Some of the students were a little startled, and I was spending far too much time in Calendar deleting superfluous entries.
To solve the second problem, I threw in a validation process. You'll need to add the following formula to cell M1:
=COUNTUNIQUE(C:C)
N1 also has a number in it, added by the script; you should leave it blank to begin with. The script now checks the number of essentially non-blank (or unique) rows and compares it to the number in N1. If N1 is less than the number of rows (meaning we've just added new homework information to the Sheet), it will run the calendar function and set the number in N1 to the number of rows. Otherwise, it's a fake "update" and the script can ignore it. It works well; now I can participate in Twitter chats without stressing out my students in the Calendar. The only thing I have watch is when I tweet out similar homework for different sections of a course to make them slightly different; usually all I need to do is change a punctuation mark.
I haven't worked out what's going on with the double posting, though. It now seems to be happening more or less randomly.
Here's how to get the script running. From the Tools menu, select "Script editor."
A new window will open. Delete the older code, and copy the code below in its place . it's a wee bit long, because my rule is to never delete anything but instead comment it out in case I want to use it later. I grabbed most of this from the internet; the main thing I added is the row counter business.
I'll explain what a few of the lines do. In general, a // in front turns the rest of the line into a comment and a semi-colon finishes an instruction.
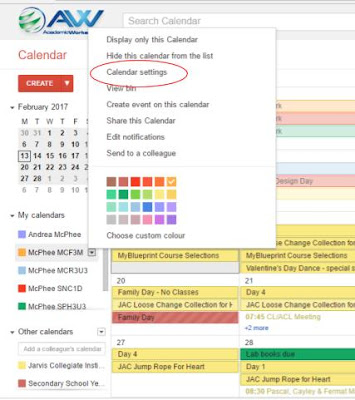
- Row 4 tells the script which calendar to use. To get the calendar id, click on the triangle next to the desired calendar and choose Calendar settings.
Scroll down to where it says Calendar Address. It's the code next to "Calendar ID," oddly enough. Copy that into the space between the quotes.

- Rows 8-22 say which columns contain which pieces of information is in. It's a letter-to-number cipher, so A=1, B=2, etc.The start date is in column 1(A), the title in 2(B), the description in 3(C), the row counting cells are in 13 & 14 (M & N).
Rows 24-55 are the main script function, getLatestAndSubmitToCalendar, which is pretty much what it says on the tin.
- Rows 26-32 get information about the sheet, including the number of rows (which I don't think I need, but they were in the original script and so I left them. I'm not sure why). The original script took the information from the last row of the sheet, but importrange() turns that into a bottomless pit, which is why I reverse sort them.
- Rows 34-47 get the actual date, title, description, and row-counting information from the Sheet.
- Rows 50-55 run the createEvent script only if a new row has been added to the Sheet, and updates N1 to match the number of rows so a new calendar event won't be created if some other "change" is made to the Sheet.
Rows 57-70 are the createEvent function, which actually creates the Calendar entry. This is pretty straightforward. I set it up to create all day events because I think it makes the Calendar look less cluttered.
Before you can release it into the wild, you need to give your script permission to muck about with your Calendar. Save the script with a useful filename, then click Run -> getLatest...Calendar. During this run, a box will pop up asking to allow permission for the script to change your Calendar, etc. Let it. Then run it again to make sure it's working smoothly. I usually check it by manually changing N1 back to 0 (or one less than the number of unique rows), running the script again, checking that N1 has been changed, then checking the Calendar to see if the entry was created. You should get email notifications if the script fails to run.
So there you have the somewhat involved process of turning tweets into Calendar entries. Please let me know if you have any questions or suggestions -- especially about that nefarious double-trigger issue!


No comments:
Post a Comment